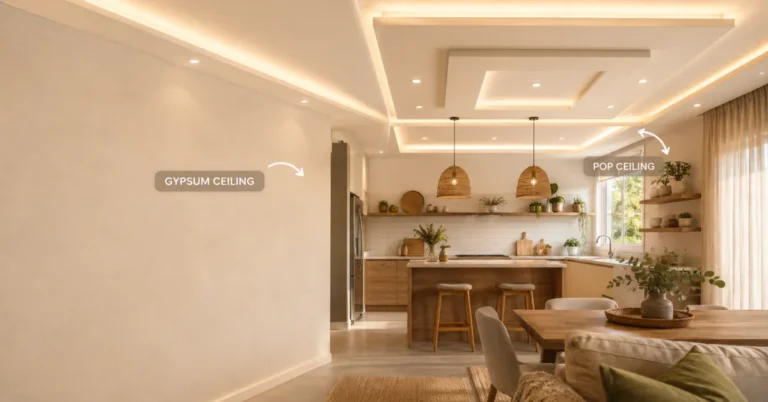

POP (Plaster of Paris) ceilings can transform a small hall from cramped and plain to stylish and spacious-feeling – without the hefty price tag of traditional suspended ceilings. The trick is knowing where to cut costs without cutting corners on durability or looks.
Installing a POP ceiling in a small hall is entirely doable on a budget when you plan materials carefully, handle the prep work right, and know which shortcuts actually work. Most small halls (under 150 square feet) can be finished for $300-800 depending on design complexity, and you can save 30-40% by doing some of the labor yourself.
Why POP Ceilings Work for Small Spaces
A POP ceiling (also called a false ceiling or drop ceiling made with plaster of Paris) creates visual height and can hide electrical wiring, uneven surfaces, and pipes without taking up much vertical space. For small halls, this matters because you’re not losing precious headroom like you would with thicker suspended systems.
POP is also cheaper than gypsum board alternatives, easier to repair if damaged, and lets you add texture, false beams, or lighting designs that make a small space feel intentional rather than cramped. Plus, it’s soundproof-friendly and can improve insulation if that’s a concern in your home.
Materials You’ll Actually Need
Before you start, gather the essentials. You don’t need fancy gear – just the right basics.
The Core Materials
- Plaster of Paris (POP) – Buy in bulk bags (25-50 kg) from building supply stores. Budget roughly $2-4 per kg depending on your location and quality grade.
- Wooden frames or metal studs – These form the ceiling structure. Metal is more durable but costs more; wood is budget-friendly if you’re not in a damp climate. Plan for roughly 1 frame per 4 square feet.
- Mesh or jute cloth – Reinforces the plaster and prevents cracking. Jute is cheaper than fiberglass mesh but both work fine for small spaces.
- Primer and paint – Budget latex paint works for ceilings; you’ll need 2 coats. A small hall typically uses 2-3 gallons.
- Joint compound and putty – For smoothing seams and imperfections before final finishing.
Tools to Have or Rent
You don’t need to buy everything. For a small project, borrowing or renting saves money:
- Scaffolding or sturdy ladder (rent for $15-30/day)
- Trowels (flat and curved) – one-time buy around $10-20
- Mixing drill and bucket – likely already at home
- Sandpaper (120 and 220 grit)
- Measuring tape and level
Total tool cost for a small project: $50-100 if buying, $30-50 if renting the big items.
Step-by-Step Installation Process
Step 1 – Measure and Plan Your Layout
Measure your hall length, width, and height. Mark where you want the false ceiling to sit – typically 6-12 inches below the original ceiling in a small hall. Use a chalk line to snap a level guideline around all four walls. This is non-negotiable; a crooked ceiling looks worse than no ceiling.
Sketch out your frame placement on paper. For a small hall, a simple grid pattern (frames every 4 feet) is budget-friendly and structurally sound. Avoid overly complex designs your first time – save those for when you’ve got experience.
Step 2 – Install the Frame Structure
Attach your wooden frames or metal studs to the walls along the chalk line using anchors and screws (every 16 inches for stability). Then run perpendicular frames across to create your grid. Check everything with a level as you go – this step determines whether your ceiling looks professional or sloppy.
For a 10×12 small hall, you’re looking at roughly 60-80 linear feet of framing material. Budget 2-3 hours for this step if you’re careful.
Step 3 – Prepare the Surface
Attach mesh or jute cloth across the frame using staples or small nails. Overlap seams by at least 2 inches and pull tight to avoid sagging. This reinforcement layer prevents cracks as the POP cures and contracts.
Step 4 – Mix and Apply POP
Mix plaster of Paris in small batches (don’t make huge batches – it sets fast, usually in 20-30 minutes). Follow package ratios exactly; too much water makes it weak, too little makes it unworkable. Consistency should be like thick pancake batter.
Apply the first coat with a flat trowel, spreading it evenly across the mesh at about 1/4 inch thickness. Work in 4×4 foot sections so you don’t get overwhelmed. Let the first coat set (usually 24 hours) before applying the second coat.
The second coat goes smoother and thinner – aim for 1/8 inch. This is where the ceiling starts looking finished. For a 120 square foot small hall, expect 3-4 days of work spread across a week (accounting for drying time).
Step 5 – Sand and Finish
Once fully cured (48 hours minimum), sand the entire ceiling lightly with 120-grit sandpaper to catch high spots and rough edges. Switch to 220-grit for a smooth final surface. Vacuum thoroughly – POP dust gets everywhere.
Apply primer (one coat) then paint (two coats). Matte white paint hides imperfections better than glossy finishes in small spaces and is cheaper too.
Budget Breakdown for a Small Hall
| Item | Cost Range |
|---|---|
| POP (bulk bags) | $100-150 |
| Framing materials (wood or metal) | $80-120 |
| Mesh/jute reinforcement | $30-50 |
| Joint compound and putty | $20-30 |
| Primer and paint | $25-40 |
| Fasteners (screws, nails, anchors) | $15-25 |
| Tool rental (if needed) | $30-50 |
| Total | $300-465 |
If you hire labor for the entire job, add $400-800 depending on local rates and complexity. DIY saves you roughly half the total cost.
Money-Saving Tips That Actually Work
Buy POP in Bulk
Buying 50 kg bags instead of 5 kg bags cuts the per-kilogram cost by 20-30%. If you’re only doing one small hall, partner with a neighbor or friend doing their own project to split a bulk order.
Skip Decorative Complexity Your First Time
False beams, recessed lighting, or textured finishes look great but add cost and complexity. A clean, flat POP ceiling with good paint looks professional and costs less. Add fancier details once you’re confident with the basics.
Use Jute Cloth Instead of Fiberglass Mesh
Jute costs 30-40% less, works just as well for small interior spaces, and is easier to work with. Save the premium mesh for moisture-prone areas like bathrooms.
Do the Prep and Finishing Yourself
Hire help only for the most physically demanding part (frame installation and first coat application) if your budget allows. Sanding, priming, and painting are straightforward enough to DIY and save $150-250.
Buy Paint and Materials from Wholesale Suppliers
Wholesale building supply stores often beat retail prices by 15-25% on bulk paint and materials. It’s worth the membership fee if you’re doing any home improvement work regularly.
Common Mistakes to Avoid
Skipping the chalk line. A crooked ceiling is permanent and obvious. Spend 20 minutes getting this right.
Rushing the drying time. Plaster needs to cure fully between coats. Rushing leads to cracking and weak ceilings. Patience saves you from redoing the whole thing.
Mixing too much POP at once. It sets fast. Better to mix small batches and work steadily than waste material because it hardened before you could use it.
Applying POP too thick. Thick coats crack as they dry. Thin, even layers that build up over multiple coats give better results and use less material.
Skipping reinforcement mesh. Saving $30 on mesh means risking cracks that cost $200+ to repair. Not worth it.
FAQ
How long does a POP ceiling installation take?
For a small hall, 5-7 days total including drying time between coats. Actual hands-on work spreads across that time – maybe 2-3 hours per day. If you’re hiring labor, it’s typically done in 2-3 days.
Can I install a POP ceiling myself if I’ve never done it before?
Yes, absolutely. The framing is straightforward if you’re careful with levels and measurements. Mixing and applying plaster has a learning curve – your first coat might look rough, but the second coat smooths it out. Watch a few YouTube videos first and do a small test section if you’re nervous.
What’s the lifespan of a POP ceiling?
With proper installation and no water damage, 10-15 years is typical. POP is durable but not waterproof, so avoid installing in bathrooms or areas prone to moisture unless you seal it properly first.
Can I paint over POP multiple times?
Yes. POP takes paint well. You can repaint every few years without damaging the underlying plaster. This makes refreshing your space easy and affordable.
What if my small hall has uneven walls or pipes I need to hide?
That’s actually where POP ceilings shine. Uneven walls and pipes are perfect reasons to install one. Just account for the extra height needed to hide what’s underneath when you mark your chalk line.
Wrapping Up
A budget-friendly POP ceiling transforms a small hall into a polished, intentional space without requiring professional help or deep pockets. The key is planning carefully, mixing materials smart, and giving the plaster time to cure properly. You’ll end up with a ceiling that looks finished and costs a fraction of what a contractor would charge.